How to Tape Like a Pro Painter
- Apr 15
- 4 min read
Achieve Clean, Crisp Paint Lines in Your Connecticut Home

One of the biggest differences between a DIY paint job and a professional finish comes down to one simple detail—clean lines. Crisp edges along trim, ceilings, and corners instantly elevate a space, while uneven or bleeding lines can make even the best color choice look sloppy.
Learning how to tape like a pro painter is essential if you want polished, professional-looking results. Whether you’re painting a bedroom in New Haven or updating your interior along the Connecticut Shoreline, proper taping technique can make all the difference.
At Rest Tech Painting, we combine precision, experience, and technique to deliver flawless finishes—and it all starts with proper preparation.

Why Proper Taping Matters for a Professional Finish
Painter’s tape might seem like a small detail, but it plays a major role in the final result.
Proper taping helps:
Create sharp, clean paint lines
Protect trim, ceilings, and adjacent surfaces
Prevent paint bleed and smudging
Reduce touch-ups and rework
Without proper taping—or proper technique—paint can seep under the edges, leaving jagged lines that are difficult to fix. This is especially noticeable in high-contrast areas, such as white trim against darker wall colors.

A Step-by-Step Guide to Taping Like a Pro
Step 1: Start with a Clean Surface
Before applying tape, make sure the surface is completely clean and dry. Dust, grease, or residue can prevent tape from sticking properly.
Wipe down trim, baseboards, and edges with a damp cloth and allow everything to dry before taping.
Step 2: Choose the Right Tape
Not all painter’s tape is the same. Using the wrong type can lead to poor adhesion or paint bleed.
Standard blue painter’s tape: Great for most interior walls
Delicate surface tape (purple or yellow): Best for freshly painted or sensitive surfaces
High-adhesion tape: Ideal for rough surfaces like textured walls
Choosing the right tape for your project ensures better results and easier removal.

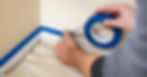
Step 3: Apply Tape Carefully and Evenly
Apply tape in straight lines along edges, trim, and corners. Avoid stretching the tape, as this can cause it to lift later.
Work in small sections and keep the tape aligned with the edge you’re protecting.
Step 4: Press Down the Edges Firmly
This is where many DIYers go wrong.
Use your fingers or a putty knife to firmly press down the edge of the tape. This seals the edge and prevents paint from bleeding underneath.
Pay extra attention to corners and uneven surfaces.
Step 5: Tape Corners and Trim Precisely
Corners require extra care to avoid gaps or overlaps:
Use shorter strips of tape for better control
Overlap slightly at corners to ensure full coverage
Trim excess tape with a utility knife if needed
Taking your time here ensures cleaner results later.
Best Types of Painter’s Tape and When to Use Them
Choosing the right tape can make or break your project. Here are the four best tapes we recommend using when prepping your next home painting project:
Blue Painter’s Tape
The most common option, suitable for most walls and trim. Easy to apply and remove.
Green FrogTape®
Known for its PaintBlock® technology, which helps prevent bleeding. Ideal for sharp lines and detailed work.
Delicate Surface Tape
Perfect for newly painted walls, wallpaper, or finished wood surfaces.
High-Adhesion Tape
Used for rough or textured surfaces where standard tape may not stick properly.
Professional painters often choose premium tape because it saves time and delivers cleaner results.

Common Taping Mistakes (and How to Avoid Them)
Even small mistakes can lead to noticeable imperfections. Here are some common taping mistakes we see and the solution for each:
Paint Bleeding Under Tape
Cause: Tape not sealed properly
Solution: Press edges firmly and apply light coats of paint
Removing Tape Too Late
Cause: Paint dries and bonds to tape
Solution: Remove tape while paint is slightly tacky (not fully dry)
Uneven or Crooked Lines
Cause: Rushing during application
Solution: Apply tape slowly and check alignment as you go
Peeling Paint with Tape Removal
Cause: Using the wrong tape or removing it incorrectly
Solution: Use appropriate tape and pull at a 45-degree angle

Pro Tips for Perfect Paint Lines
Professional painters rely on technique just as much as tools. Here are some pro tips for getting perfect lines every time:
Seal the Tape Edge
For ultra-clean lines, lightly paint over the edge of the tape with the base color first. This seals any gaps and prevents bleed-through when applying the final color.
Use Thin, Even Coats
Thick coats of paint are more likely to seep under tape. Multiple thin coats produce better results.
Know When to Cut In Instead of Tape
Experienced painters often skip tape entirely and “cut in” by hand using a steady brush.
While this takes practice, it can be faster and more precise in certain situations.
Remove Tape at the Right Time
Timing is critical. Remove tape when the paint is dry to the touch but not fully cured. This helps prevent tearing or peeling.
When It’s Better to Skip DIY and Hire a Professional
Taping may seem simple, but achieving truly clean, professional lines takes time, patience, and experience.
For larger projects or high-visibility areas, hiring a professional painter ensures:
Perfectly straight, crisp edges
No paint bleed or touch-ups needed
Faster project completion
Consistent, high-quality results
At Rest Tech Painting, we specialize in precision interior painting across New Haven, Fairfield County, and the Connecticut Shoreline. Our team knows when to tape, when to cut in, and how to deliver flawless results every time.
Get Flawless Paint Lines with Rest Tech Painting
Clean paint lines can transform a room—but only when done right. Whether you’re tackling a DIY project or planning a full interior refresh, proper technique makes all the difference.
If you want sharp, professional results without the stress, let the experts handle it.
👉 Contact Rest Tech Painting today to schedule your interior painting consultation and achieve a flawless finish in your Connecticut home.